
There are various reasons you should transfer photos from the iPhone to a computer: to have copies on the hard drive, edit the images, or gift a copy to a friend. Well, transferring photos from an iPhone to a computer was a rather difficult operation due to their incompatibility. However, the old difficulties no longer exist. In this post, you’ll learn how to swiftly and easily transfer photos from your iPhone to a computer. We’ll also show you how to accomplish it on a Mac or computer.
How To Easily Transfer iPhone Photos Using iCloud To Computer?
Downloading your photos from the iCloud service is the simplest way to transfer them to a computer. This procedure needs you to turn on iCloud storage on the iPhone. When you do this, your photos are saved and available from any computer. When transferring to a Mac, the process is quite simple. However, some planning is required if you’re moving to a Windows computer. To obtain access to your iCloud photos, follow these steps:
1 – Ensure your computer is running the most recent Windows 10. If it isn’t, make the appropriate updates.
2 – Download and install iCloud for Windows 10.
3 – Sign in with your Apple ID to iCloud. Suppose you need help with how to follow the instructions that came with your iPhone.
4 – In iCloud for Windows, select Options next to Photos and choose iCloud photos.
5 – Click Done and then Apply.
After you’ve finished everything, click the Download icon to view and download your iCloud photos (the cloud with a downward-facing arrow). Aside from downloading, you may edit the pictures on your computer while they are in iCloud, and edited version will be available on any device.
How To Easily Transfer iPhone Photos To Computer Using iTunes?
To transfer photos to a computer via a USB cord, you must install the latest iTunes version. Next, connect your iPhone to the computer via the USB lightning cord after ensuring that iTunes is up to date. Keep an eye on your phone since it may need to be unlocked before you can proceed. If a Trust This Computer prompt appears, tap Trust or Allow to provide your computer access to the iPhone photos.
Note: You can’t transfer any iCloud photos unless you have already downloaded them to your iPhone. This is because the picture is not present on the device.
How To Easily Transfer iPhone Photos Using The Photos App?
1 – After connecting your iPhone to your computer, open the Photos app. This may be accomplished by heading to the home screen and choosing Photos.
2 – Go to Import in the app, then choose From a USB device and follow the instructions.
3 – Transfer the photos you wish to save to your computer.
Well, if you’re transferring to a Mac, plug in the iPhone and open the Photos app. Similarly to connecting to a computer, you may need to unlock your iPhone and let the phone connect on “Trust This Computer” prompt. Next, you should view the Import screen in the Photos app, which displays your iPhone’s photos. If you don’t see it, click on your phone’s name in the left-hand sidebar. You can choose which photos to transfer or select Import All New Photos to copy all pictures to your Mac.
How To Easily Transfer iPhone Images To A Computer Without Apps?
If you do not have iTunes or iCloud on your computer and wish to transfer photos from an iPhone without installing anything, try the following:
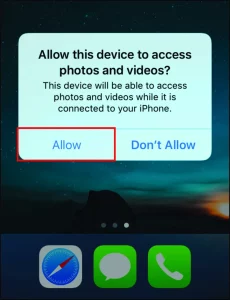
1 – Use the USB cord to connect your iPhone to the computer. If you do not have iTunes, instead of Trust This Computer, your phone will display a “Allow this device to access photos and videos” prompt. Allow should be selected.
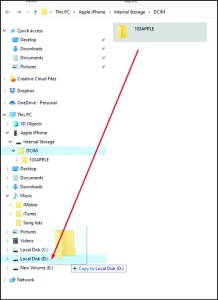
2 – Launch File Explorer for Windows 10 on your computer. The iPhone is displayed as a new device on the left sidebar. Be warned that it will display the device’s name rather than “iPhone.”

3 – In the sidebar, double-click the phone. Because connecting without iTunes prevents you from exploring other files and folders on the iPhone, you’ll only see the “DCIM” folder.

4 – Depending on the number of photos on your iPhone and whether or not you use iCloud, you’ll notice one or more subfolders in the “DCIM” folder. The default folder for pictures is “100APPLE,” with subsequent folders increasing the number to 101, 102, and so on. All of the iPhone photos are located there.
5 – Once you’ve located the files to be transferred, drag and drop them to the desired spot on the computer. Ensure you’re copying the files rather than moving them, as the “Move” option deletes them from the iPhone.
You can easily copy the photos to the Pictures folder and/or a new folder you created earlier. However, moving the files is preferable to copying if you want to transfer the photos while also clearing the capacity on your phone.
How To Easily Transfer iPhone Images To Computer Via Bluetooth?
Bluetooth is yet another option for photo transfer. Earlier iPhone models did not enable Bluetooth connections to Android or computers, but contemporary devices do. Connecting the iPhone to your computer over Bluetooth is as simple as connecting two devices.
1 – Turn on your phone’s connection and make sure it’s discoverable.
2 – Enable Bluetooth on your computer and turn it on to discover new devices. Connect to the iPhone, then input the one-time security code.
3 – After establishing the Bluetooth connection, transfer the photos using the identical methods for USB connections.
How To Easily Transfer iPhone Photos To Computer Using Email?
If you experience unexpected troubles with the iPhone-to-computer connection, there is another solution that always works. Maybe you don’t have a Lightning-to-USB cable, or your computer doesn’t support Bluetooth. You may want to send the same picture to several individuals simultaneously. An email is always an option.
Pictures can be attached to emails on an iPhone just as easily as on a desktop computer. First, ensure they are in the right format and within the size limit. Next, insert the images into the message, add the receivers and send the email. This may be the greatest option if you only need to transfer a few photos. You don’t need to be in the same room as the computer, and you can even email yourself.
Handle Specific File Formats
Most files you transfer from your iPhone will have the standard JPEG, MOV, and PNG extensions. However, beginning with iOS 11, the default format for pictures on iPhones has been HEIF or HEIC. This new picture format has the same picture quality as JPEG but delivers reduced file sizes. Unfortunately, there is one drawback: the file extension cannot be seen on anything other than an Apple device without using a third-party reader. However, there is an incorporated solution if you find HEIF and/or HEIC photos on your iPhone and wish to refrain from installing third-party software to view or convert them on your computer.
1 – Navigate to Photos in your iPhone’s settings.
2 – Select Automatic from the Transfer to Mac or computer menu.
3 – The iPhone automatically transforms pictures into JPEG when transferring pictures to a computer.
You may also configure your iPhone to always take pictures in JPEG format by heading to camera settings and choosing Most Compatible under Formats.
Locate Photos On The Computer
After transferring the pictures to your Mac or computer, you can access them for copying or editing. This is rather simple on Windows—located in the “Photos” folder and/or in a custom folder you created if you transferred the photos without using iTunes. However, you must go further to find the real photo files on macOS. The following are the steps to find your photo files on a Mac:
1 – Launch Finder, navigate to Home and select the Pictures folder.
2 – Right-click on Photos Library and select Show Package Contents.
3 – Launch the Masters’ folder in the new window.
You now have access to all images on your Mac and may edit or copy them as needed. You can also use the Spotlight search to find photos by kind. This strategy is a little more involved and works best if you know what to search for. Finally, developers have created many third-party apps for searching for and organizing photos on Mac. If the first two methods appear too difficult, you may use software to handle the work.
Conclusion:
Finally, transferring files and photos from an iPhone to a computer, especially a computer, is no longer an issue. Sharing between platforms is becoming more straightforward as time passes, especially with cloud services with upload/download capability. You can transfer photos from your iPhone to the computer in no time now that you’ve mastered all important methods, such as using cloud services, USB and Bluetooth connections, and even email.